MQTT Mosquitto broker – Client Authentication and Client Certificates

After seeing how to set up transport layer security for the Mosquitto MQTT broker by using the Transport layer security on this post, we need to see how to setup client authentication (only authorized clients can connect to the broker) either by using the common user/password based authentication method or using client certificates.

Authentication by user and password:
First let’s enable authentication to the broker by setting up user and password authentication. For enabling this kind of authentication we need to modify the broker configuration (/etc/mosquitto/mosquitto.conf in my case) file and change the following entries:

allow_anonymous false
password_file /etc/mosquitto/passwd_mqtt

Before restarting the MQTT broker we need to add some users to the passwd_mqtt file with the command mosquitto_passwd:

mosquitto_passwd -c passwd_mqtt user1

The -c parameter is for creating the initial password file, if doesn’t exist, otherwise it will overwrite it!. For adding new users or update the passwords just run the command without the -c parameter.

After restarting the broker will should not be able to logon anonymously:

# mosquitto_pub --cafile /etc/mosquitto/certs/ca.crt -h localhost -t "test" -m "message" -p 8883 -d
Client mosqpub/25688-pcortex sending CONNECT
Client mosqpub/25688-pcortex received CONNACK
Connection Refused: not authorised.
Error: The connection was refused.

But providing the user name and password:

# mosquitto_pub --cafile /etc/mosquitto/certs/ca.crt -h localhost -t "test" -m "message" -p 8883 -d -u user1 -P secret
Client mosqpub/25709-pcortex sending CONNECT
Client mosqpub/25709-pcortex received CONNACK
Client mosqpub/25709-pcortex sending PUBLISH (d0, q0, r0, m1, 'test', ... (7 bytes))
Client mosqpub/25709-pcortex sending DISCONNECT 

For subscription, the same has to be done, again by providing a user and password:

# mosquitto_sub -t \$SYS/broker/bytes/\# -v --cafile /etc/mosquitto/certs/ca.crt -p 8883 -u user1 -P secret
$SYS/broker/bytes/received 217
$SYS/broker/bytes/sent 20

Authentication by using client certificates
Using client certificates, signed by a certificate authority, assures the client identity. The certificate authority used must be the same used by the server certificates and is only supported over TLS/SSL.
For using client certificates for authentication, we need to change the listener configuration for TLS/SSL by adding the following directives:

# MQTT over TLS/SSL
listener 8883
cafile /etc/mosquitto/certs/ca.crt
certfile /etc/mosquitto/certs/hostname.crt
keyfile /etc/mosquitto/certs/hostname.key
require_certificate true
use_identity_as_username true

The require_certificate directive with the value true means that clients must now provide a client certificate to connect.
The use_identity_as_username means that the user name of the connecting user is taken from the CN (Common Name) property of the certificate, otherwise we still need to provide an user and password.

With the above new configuration, we now can’t access the broker with user/password token:

mosquitto_pub --cafile /etc/mosquitto/certs/ca.crt -h localhost -t "test" -m "message" -p 8883 -d -u user1 -P secret
Client mosqpub/26549-pcortex sending CONNECT
Error: A TLS error occurred.

the result on the log file is:

1478537500: New connection from 127.0.0.1 on port 8883.
1478537500: OpenSSL Error: error:140890C7:SSL routines:ssl3_get_client_certificate:peer did not return a certificate
1478537500: Socket error on client , disconnecting.

For accessing now the broker we must provide a client certificate and a private key. The client certificate must be generated from the same CA (Certificate authority) that created the server certificate, otherwise, the client certificate can’t be validated, and the connection fails:

1478537629: New connection from 127.0.0.1 on port 8883.
1478537629: OpenSSL Error: error:14089086:SSL routines:ssl3_get_client_certificate:certificate verify failed
1478537629: Socket error on client , disconnecting.

So on the same directory where the ca.crt and ca.key are residing execute the script to create the client certificate. For example for creating a client certificate for user1, we need to execute the following command:

# ./gen_CA.sh client user1

And we should have three files, two of them the user1.crt, the user certificate, and the user1.key, the user1 private key.

We can now logon to the broker:

# mosquitto_pub --cafile /etc/mosquitto/certs/ca.crt -h localhost -t "test" -m "message" -p 8883 -d  --cert user1.crt --key user1.key 
Client mosqpub/30264-pcortex sending CONNECT
Client mosqpub/30264-pcortex received CONNACK
Client mosqpub/30264-pcortex sending PUBLISH (d0, q0, r0, m1, 'test', ... (7 bytes))
Client mosqpub/30264-pcortex sending DISCONNECT

If we check the log, we have the following:

1478539830: New client connected from 127.0.0.1 as mosqpub/27159-pcortex (c1, k60, u'user1').
1478539830: Client mosqpub/27159-pcortex disconnected.
1478601507: New connection from 127.0.0.1 on port 8883.

We can see that the broker extracted the username from the certificate property CN. If we don’t use the use_identity_as_username as true we need to provide the username and password and the client certificate. In this case, the certificate is validated, and the user used to logon might not be the same as the one defined on the CN certificate property. So without this directive we either need to allow anonymous logon again or define user and passwords.

Additional thoughts:
With user and password authentication we can revoke access to an user, by deleting it from the password file or changing the password.
But what about the authentication based on client certificates? As long the certificate is valid, the user can logon at will, since the broker will always accept it until the end of the certificate validation date.
The solution for this is to revocate the client certificate so when it is used, the broker rejects it. For this functionality, most Certificate Authorities provide the revocation list by providing either by CRL (Certificate Revocation list) file, or by OSCP (Online Status Certificate Protocol), and the server checks the client certificate on this list before allowing access. Mosquitto broker only works with CRL files.

We need to modify the listener configuration to verify the client certificates if it was revocated or not:

# MQTT over TLS/SSL
listener 8883
cafile /etc/mosquitto/certs/ca.crt
certfile /etc/mosquitto/certs/hostname.crt
keyfile /etc/mosquitto/certs/hostname.key
require_certificate true
use_identity_as_username true
crlfile /etc/mosquitto/certs/ca.crl

The issue now is that the script that we are using for generating certificates doesn’t generate CRLs, and so we can’t revocate certificates by using this script.

We can do it by hand, but that wouldn’t make our life much easier, since revocating certificates means that the CA server must now track all certificates and their status.
One possible solution is to use scripts that allow to create (a not very secure) CA: easy-ca. These scripts will replace the genCA.sh script and allow the revocation of certificates.

Getting the easy-CA scripts:

git clone https://github.com/fcgdam/easy-ca.git

I’m omitting a lot of output that these scripts do, namely asking for the Organization name, CA passwords and so on.

Somewhere where we find suitable we create our CA:

Generating the CA:

# cd ~ 
# ~/easy-ca/create-root-ca -d CA
# cd CA

Then at the CA directory we created, we can now create our broker certificate and user certificate. Make sure that the names make sense.

Generating the broker certificate:

# bin/create-ssl -s brokername
# bin/create-client -c user1

At the end we have the following files:

ca/ca.crt

We now have all the needed files for setting up our broker with support for CRL.

# sudo -s
# cp ~/CA/ca/ca.crt /etc/mosquitto/certs
# cp ~/CA/crl/ca.crl /etc/mosquitto/certs
# cp ~/CA/certs/brokername.server.crt /etc/mosquitto/certs/brokername.crt
# cp ~/CA/private/brokername.server.key /etc/mosquitto/certs/brokername.key

And restarting the broker we have the new certificates in place.
We can test now by using our CA user certificate:

# cd ~/CA
# mosquitto_pub --cafile /etc/mosquitto/certs/ca.crt -h localhost -t "test" -m "message" -p 8883 -d  --cert certs/user1.client.crt --key private/user1.client.key 
Client mosqpub/7424-pcortex sending CONNECT
Client mosqpub/7424-pcortex received CONNACK
Client mosqpub/7424-pcortex sending PUBLISH (d0, q0, r0, m1, 'test', ... (7 bytes))
Client mosqpub/7424-pcortex sending DISCONNECT

It works. Now let’s revoke the user certificate:

# bin/revoke-cert -c certs/user1.client.crt 

Revoking certificate 'certs/user1.client.crt'

Reason for revocation: 

1. unspecified
2. keyCompromise
3. CACompromise
4. affiliationChanged
5. superseded
6. cessationOfOperation
7. certificateHold

Enter 1-7 [1]: 2
You are about to revoke this certificate with reason 'keyCompromise'.
Are you SURE you wish to continue? [y/N]: y
Using configuration from conf/ca.conf
Revoking Certificate 02.
Data Base Updated
Using configuration from conf/ca.conf

Server certificate revoked.

We need to copy the new CRL to the directory where mosquitto expects the CRL:

# sudo cp crl/ca.crl /etc/mosquitto/certs

And after restarting the broker we have:

mosquitto_pub --cafile /etc/mosquitto/certs/ca.crt -h localhost -t "test" -m "message" -p 8883 -d  --cert certs/user1.client.crt --key private/user1.client.key  
Client mosqpub/7640-pcortex sending CONNECT
Error: A TLS error occurred.

And on the logs:

1478625909: OpenSSL Error: error:14089086:SSL routines:ssl3_get_client_certificate:certificate verify failed
1478625909: Socket error on client , disconnecting.
1478625910: New connection from 127.0.0.1 on port 8883.

ODroid – Mosquitto MQTT Broker install

Just for a quick reference, the following instructions detail how to install the latest Mosquitto MQTT broker with Websockets enabled on the ODroid C1+ running (L)Ubuntu release. The instructions are probably also valid for other platforms, but not tested.

1. Install the prerequisites
As the root user, install the following libraries:

apt-get update
apt-get install uuid-dev libwebsockets-dev

Probably the SSL libraries, and a few others are also needed, but in my case they where already installed.

2. Mosquitto install
Download and compile the Mosquitto broker:

mkdir ~/mosq
cd ~/mosq
wget http://mosquitto.org/files/source/mosquitto-1.4.5.tar.gz
tar xvzf mosquitto-1.4.5.tar.gz
cd mosquitto-1.4.5/

Edit the config.mk file to enable the websockets support:

# Build with websockets support on the broker.
WITH_WEBSOCKETS:=yes

and compile and install:

make
make install

3. Configuration
Copy the file mosquitto.conf to /usr/local/etc, and edit the file:

cp mosquitto.conf /usr/local/etc
cd /usr/local/etc

Add at least the following lines to mosquitto.conf file to enable websockets support.

# Port to use for the default listener.
#port 1883
listener 1883
listener 9001
protocol websockets

Add an operating system runtime user for the Mosquitto daemon:

useradd -lm mosquitto
cd /usr/local/etc
chown mosquitto mosquitto.conf

If needed, or wanted, change also on the configuration file the logging level and destination.
For example:

# Note that if the broker is running as a Windows service it will default to
# "log_dest none" and neither stdout nor stderr logging is available.
# Use "log_dest none" if you wish to disable logging.
log_dest file /var/log/mosquitto.log

# If using syslog logging (not on Windows), messages will be logged to the
# "daemon" facility by default. Use the log_facility option to choose which of
# local0 to local7 to log to instead. The option value should be an integer
# value, e.g. "log_facility 5" to use local5.
#log_facility

# Types of messages to log. Use multiple log_type lines for logging
# multiple types of messages.
# Possible types are: debug, error, warning, notice, information, 
# none, subscribe, unsubscribe, websockets, all.
# Note that debug type messages are for decoding the incoming/outgoing
# network packets. They are not logged in "topics".
log_type error
log_type warning
log_type notice
log_type information

# Change the websockets logging level. This is a global option, it is not
# possible to set per listener. This is an integer that is interpreted by
# libwebsockets as a bit mask for its lws_log_levels enum. See the
# libwebsockets documentation for more details. "log_type websockets" must also
# be enabled.
websockets_log_level 0

# If set to true, client connection and disconnection messages will be included
# in the log.
connection_messages true

# If set to true, add a timestamp value to each log message.
log_timestamp true

4. Automatic start
The easiest way is to add the following file to the init.d directory and link it to the current runlevel:

Create the file named mosquitto under /etc/init.d

#!/bin/bash

case "$1" in
    start)
        echo "Starting Mosquitto MQTT Broker"
        touch /var/log/mosquitto.log
        chown mosquitto /var/log/mosquitto.log
        su - mosquitto -c "/usr/local/sbin/mosquitto -c /usr/local/etc/mosquitto.conf" & > /dev/null 2>/dev/null
        ;;
    stop)
        echo "Stopping Mosquitto MQTT Broker"
        killall mosquitto
        ;;
    *)
        echo "Usage: /etc/init.d/mosquitto start|stop"
        exit 1
        ;;
esac

exit 0

Find out the current run level. On Odroid it seems that is level 2:

root@odroid:/etc/init.d# runlevel
N 2
root@odroid:/etc/init.d# 

And link the automatic start for Mosquitto broker at run level 2:

cd /etc/rc2.d
ln -s  /etc/init.d/mosquitto S97mosquitto

And that’s it.

We can start manually the broker with the command /etc/init.d/mosquitto start, and stop it with the mosquitto stop command.

Setting up an IoT framework/dashboard with NodeRed, Mosca/Mosquitto and Freeboard.io dashboard

With the low cost of the esp8266 chip and boards, it is now easy and affordable to add connectivity  to almost anything that we can think of. Still if we build an Internet of Things device by enabling it with the esp8266 chip to connect to the internet, or other networks, what we can do with the data that we gather? Basically we do what we do with any data that we get, store it, process it and show it, and that’s what we are going to see on this post.

The software (running on Linux platform) that I’ll use is the following:

IBM NodeRed: (http://nodered.org/) This great software will allow us to get data, process it, store and publish it, with a workflow based designer. It runs under Node-Js Javascript based server engine.

MQTT Broker Mosca: (http://www.mosca.io/) There are several MQTT brokers available, but this one runs on Node-Js and so is platform agnostic, and runs where Node-Js runs. Also it has websocket support out of the box, which allows to use the Freboard.io dashboard in a straight foward way.

Freeboard.io Dashboard: (http://freeboard.io/) Is a great dashboard and freely available at the project GitHub page (https://github.com/Freeboard/freeboard). It allows to design and store several dashboards with some cool widgets.

Step 1: Setting up NodeRed:

First of all make sure that you have node and npm (the node package manager) installed on your distribution. You can see that with the commands node -v and npm -v for checking out their versions. In my case, and for now, it’s version v0.10.33 for nodejs and 1.4.28 for npm.

First I’ve created a directory named IoTServer where I’ll keep all software and configurations.

Download the zip file from nodered GitHub page https://github.com/node-red/node-red or just clone the repository. I clone the repository, because it’s simpler in the future to update it with just git pull. First just make sure that you have the icu/libicu libraries installed.

cd ~
mkdir IoTServer
cd IoTServer
git clone https://github.com/node-red/node-red
cd node-red
npm install

We can now run the nodered server with the command node red.js -v. I use -v at the end to see if any error crops up and also to see if any node modules are missing, and need to be installed. For example:

pcortex@cloudsrv:~/IoTServer/node-red$ node red.js -v  
   Welcome to Node-RED 
   =================== 
 
24 Feb 11:35:16 - [info] Node-RED version: v0.10.3.git 
24 Feb 11:35:16 - [info] Node.js  version: v0.10.33 
24 Feb 11:35:16 - [info] Loading palette nodes 
24 Feb 11:35:59 - [warn] ------------------------------------------ 
24 Feb 11:35:59 - [warn] [arduino] Error: Cannot find module 'arduino-firmata' 
24 Feb 11:35:59 - [warn] [rpi-gpio] Info : Ignoring Raspberry Pi specific node. 
24 Feb 11:35:59 - [warn] [redisout] Error: Cannot find module 'redis' 
24 Feb 11:35:59 - [warn] [mongodb] Error: Cannot find module 'mongodb' 
24 Feb 11:35:59 - [warn] ------------------------------------------ 
24 Feb 11:35:59 - [info] Server now running at http://127.0.0.1:1880/ 
24 Feb 11:35:59 - [info] Flows file not found : flows_clouds.json 
24 Feb 11:35:59 - [info] Starting flows

As we can see the node modules arduino, rpi-gpio, redisout and mongodb are missing. If we are going to use them, we need to install them with the npm tool. Also the following message: Flows file not found : flows_clouds.json informs us that no saved nodered workflows where found. We can now access the nodered at adress http://localhost:1880/. If we want to change the bind address or add authentication, we should change the settings.js file. Take a look at http://nodered.org/docs/configuration.html for more information, and start nodered with: node red.js -v -s settings.js

We can now start designing our nodered workflows that receive data from the esp8266 via MQTT protocol or even by simple REST based HTTP protocol, process it and store the data payload, if any.

For storing data into a database, we can use MongoDB, or mysql, for example, installing the needed modules.

For mysql we can do:

cd ~/IoTServer/node-red
npm install bignumber.js require-all readable-stream
npm install mysql
npm install node-red-node-mysql

And we need to restart nodered. The mysql node should be available now in storage pallet.

Step 2: Installing Mosca MQTT broker (Alternative 1 for the MQTT Broker)

We can use several brokers, but since we already are running nodered on node-js, we will use Mosca. Both nodered and Mosca can provide a websocked based interface. This is of interest because we can use browser based websocket applications, like freeboard.io, to consume data from our IoT devices.

cd ~
sudo -s
sudo npm install mosca bunyan -g

And to run it just do: mosca -v | bunyan

For running it with websockets enabled, on TCP port 3000, just do:

mosca -v --http-port 3000 --http-bundle --http-static ./ | bunyan

Check out the documentation for more information at: https://github.com/mcollina/mosca/wiki/MQTT-over-Websockets

Step 2: Mosquitto MQTT broker with Websockets support (Alternative 2 for the MQTT Broker)

If having trouble installing or using Mosca, we can use the latest Mosquitto version 1.4 that has websockets support.

For that we need to make sure that cmake and uuid/uuid-dev are installed (For example: sudo apt-get install cmake uuid uuid-dev).

Also we need to download the libwesockets library, compile it and install it:

cd ~/IoTServer
git clone git://git.libwebsockets.org/libwebsockets
cd libwesockets
mkdir build
cd build
cmake ..
make
sudo make install
We then need to download and compile Mosquitto 1.4:
cd ~/IoTServer
wget http://mosquitto.org/files/source/mosquitto-1.4.tar.gz
tar xvzf mosquitto-1.4.tar.gz
cd mosquitto-1.4
We need to edit the config.mk file and change the option WITH_WEBSOCKETS:=no  to WITH_WEBSOCKETS:=yes
And finally:
make
sudo make install
To activate websocket support we need to edit the mosquitto.conf file located at /etc/mosquitto or some other directory and add the following lines, for example at the end of the file:
listener 1883

listener 9001 127.0.0.1
protocol websockets

Then we run it with:

pcortex@cloudsrv:~/IoTServer$ mosquitto -c /etc/mosquitto/mosquitto.conf
1424790588: mosquitto version 1.4 (build date 2015-02-24 14:38:47+0000) starting 
1424790588: Config loaded from /etc/mosquitto/mosquitto.conf. 
1424790588: Opening ipv4 listen socket on port 1883. 
1424790588: Opening ipv6 listen socket on port 1883. 
1424790588: Opening websockets listen socket on port 9001.

Step 3: Installing freeboard.io dashboard

We are almost at the end of this long post. For our infrastructure we need now to install the dashboard that will allow us to see the data in the browser.
cd ~/IoTServer
git clone https://github.com/Freeboard/freeboard.git

For now I’ll just use apache to serve the freeboard dashboards that is installed in my server. Because freeboard is not installed on the root web directory we need to make the freeboard available to Apache. The easiest way to do this, as long as Apache has the FollowSymLinks option enabled for the document root, is to create a link to the freeboard directory on the web document root:

sudo -s
cd /var/www
ln -s /home/pcortex/IoTServer/freeboard iot

And now freeboard is available at the url http://myserveraddres/iot.

We need now, and finally to add MQTT over Websockets support to freeboard… We are almost there. This post http://jpmens.net/2014/11/12/freeboard-a-versatile-dashboard/   shows how it’s done but I’ll repeat it here again:

1st: Download the development version of mqtt.js here: (http://git.eclipse.org/c/paho/org.eclipse.paho.mqtt.javascript.git/plain/src/mqttws31.js?h=develop) and save it:

cd ~/IoTServer/freeboard/plugins
mkdir mqtt
cd mqtt
wget --output-document mqttws31.js http://git.eclipse.org/c/paho/org.eclipse.paho.mqtt.javascript.git/plain/src/mqttws31.js?h=develop

We will now download the freeboard MQTT plugin:

cd ~/IotServer
git clone https://github.com/alsm/freeboard-mqtt
cd freeboard/plugins/mqtt
cp ~/IoTServer/freeboard-mqtt/paho.mqtt.plugin.js .

We need to edit the paho.mqtt.plugin.js file and change the line:

                "external_scripts" : [
                        "<full address of the paho mqtt javascript client>" 
                ],

to

               "external_scripts" : [
                        "plugins/mqtt/mqttws31.js" 
                ],

and finally we need to change the index.html file from:

   <scripttype="text/javascript">
        head.js("js/freeboard+plugins.min.js", 
                // *** Load more plugins here *** 
                function(){

to

   <scripttype="text/javascript">
        head.js("js/freeboard+plugins.min.js", 
                "plugins/mqtt/paho.mqtt.plugin.js", 
                // *** Load more plugins here *** 
                function(){

That’s it. We are finally ready. All infrastructure is done. We need now just to configure it.

Final step: Testing it out with mosquitto websockets!:

Let’s start Mosquitto: nohup mosquitto -c /etc/mosquitto/mosquitto.conf &

And check if the WS protocol is active:

netstat -nap | grep 9001

tcp        0      0 0.0.0.0:9001            0.0.0.0:*               LISTEN      18973/mosquitto

Setting up Freeboard.io:  It’s very important to notice that the Dashboard will run on our browser, making in fact our browser the client. This means that when we configure freeboard, we must take notice of this when filling up the MQTT broker address. It will be localhost if the browser AND the broker runs on the same machine, but for the dashboard to work anywhere we should use the public ip of the machine running the broker:

Access the freeboard.io dashboard, and select Datasources -> Add. From the dropdown box, we select the Paho MQTT provider.

Selection_055

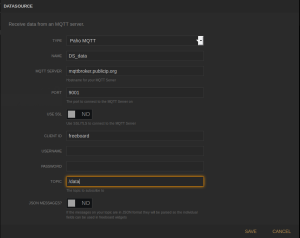
We need to configure the data source as follows:

Selection_056

Change the MQTT server address to something that makes sense in your config.

For Mosquitto with websockets enabled, the port is 9001, and for Mosca, the port is 3000, but of course this can change, depending of the configuration used.

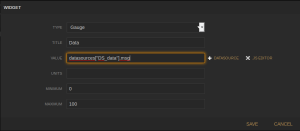
We can now add a Panel and a gauge to see data from the topic /data that we defined on the above datasource.

So, Add Pane, and on the new Pane select the + (plus) to add a widget. In our case we will select Gauge. We fill out the required info and on the Value field we press Datasource, and select the newly previous created datasource named Data and because we are not using JSON for data, we just append .msg at the end. So something like datasource[“DS_data”].msg should be writen.

Selection_057

We press Save, and that’s it.

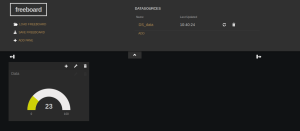
We can now publish into the topic, and the dashboard should update:

Selection_058

For example, in this case: mosquitto_pub -t /data -m 23

That’s it. It works fine with Mosquitto 1.4 with websockets enabled and with the Mosca MQTT broker.

Final setup:

We should make our dashboard permanent and for doing so we need to save the dashboard locally as a JSON file, and move it to the server running the dashboard to the root directory of freeboard.

After that we call directly the saved dashboard with the following URL:

http://myserveraddress/iot/index.html?load=dashboard.json

Edit: For Websocket support on the Freeboard.io Dashboard, please checkout Freeboard and WebSockets

Warning:The current freeboard.io project at Github (as of 12/2015) has problems saving dashboards when using Firefox. For saving dashboards use Chrome/Chromium.