Node-Red: Checking network service port status + UI status indicator

This post is about how to do two simple things using Node-Red:

  1. Check if network service on the machine running Node-Red is available by checking the corresponding listening port.
  2. The Node-Red UI doesn’t have a status indicator available, so I’ve built one

The only limitation on the following solution is that it only tests for ports for services that are running on the same server, where Node-Red is also running.

Preparation:

We need to install the Is Port Available NPM Module and make it available into our Node-Red instance.

For doing so, in Linux we must do the following:

root@server:~# cd .node-red/
root@server:~/.node-red# npm i --save is-port-available

We need now to make this node module available to Node-Red by editing the settings.js file:

root@server:~/.node-red# vi settings.js

Add the module to the global context on the function named functionGlobalContext:

    functionGlobalContext: {
        // os:require('os'),
        // octalbonescript:require('octalbonescript'),
        // jfive:require("johnny-five"),
        // j5board:require("johnny-five").Board({repl:false})

        portavail:require('is-port-available')
    },

You might have other modules configured, so we need to add the above portavail:require(‘is-port-available’) line to that list preceded by a comma.

We need to restart Node-Red to make the module available to the flows.

The testing flow
In our Function nodes, we can now use the global context object portavail to access the is-port-available module.

For example for testing the InfluxDB server port (1086/TCP) we can write the following function:

    // Instantiate locally on the flow the is-port-available module
    const isPortAvailable = context.global.portavail;

    msg.payload = {};   // Zero out the message. Not really necessary
     
    var port = 1086; // Replace this with your service port number. In this case 1086 is the Influx DB port
    
    isPortAvailable(port).then( status => {
        if(status) {
            //console.log('Port ' + port + ' IS available!');
            msg.payload = {'InfluxDB':false,"title":"InfluxDB","color":"red"};   // The port is available, hence the server is NOT running
            node.send(msg);
        } else {
            //console.log('Port ' + port + ' IS NOT available!');
            //console.log('Reason : ' + isPortAvailable.lastError);
            msg.payload = {'InfluxDB':true,"title":"InfluxDB","color":"green"};    // The port is not available, so the server MIGHT be running
            node.send(msg);
           
        }
    });

    // Note that we DO NOT return a message here since the above code is asynchronous and it will emit the message in the future. 

Since the test is using promises, Node-Red will continue executing without waiting for the test response (the isPortAvailable(port) code ). So we do not send any message further on the normal Node-Red execution flow (hence there is no return msg; object) and the message is only emitted when the promise fulfils. When that happens we just send the message with the node.send(msg) statement.

The message payload can be anything, being the only important properties the title and color that are used for creating the UI status indicator.

The status indicator is a simple Angularjs template that displays the title and a status circle with the chosen colour.

Since pasting CSS and HTML code in WordPress is recipe to disaster, the template code can be accessed on this gist or on the complete test flow below:

[{"id":"1f506795.4be25","type":"inject","z":"53f8b852.885c6","name":"Check todos os 60s","topic":"","payload":"","payloadType":"date","repeat":"60","crontab":"","once":true,"x":260,"y":96,"wires":[["5d180fc7.9ad06","27e67f9b.4f9158"]]},{"id":"5d180fc7.9ad06","type":"function","z":"53f8b852.885c6","name":"Test Influx DB","func":"    const isPortAvailable = context.global.portavail;\n    msg.payload = {};\n     \n    var port = 8086;\n    \n    isPortAvailable(port).then( status =>{\n        if(status) {\n            //console.log('Port ' + port + ' IS available!');\n            msg.payload = {'InfluxDB':false,\"title\":\"InfluxDB\",\"color\":\"red\"};   // The port is available, hence the server is NOT running\n            node.send(msg);\n        } else {\n            //console.log('Port ' + port + ' IS NOT available!');\n            //console.log('Reason : ' + isPortAvailable.lastError);\n            msg.payload = {'InfluxDB':true,\"title\":\"InfluxDB\",\"color\":\"green\"};    // The port is not available, so the server MIGHT be running\n            node.send(msg);\n           \n        }\n    });\n    ","outputs":1,"noerr":0,"x":533.5,"y":97,"wires":[["3f3f8226.c9bfb6"]]},{"id":"3f3f8226.c9bfb6","type":"ui_template","z":"53f8b852.885c6","group":"44e5d7ea.043b2","name":"Status Icon","order":0,"width":0,"height":0,"format":"\n.dot {\n    height: 25px;\n    width: 25px;\n    background-color: #bbb;\n    border-radius: 50%;\n    display: inline-block;\n    float: right;\n}\n\n\n
{{msg.payload.title}}\n \n
","storeOutMessages":true,"fwdInMessages":true,"x":780,"y":96,"wires":[[]]},{"id":"27e67f9b.4f9158","type":"function","z":"53f8b852.885c6","name":"Test MongoDB","func":" const isPortAvailable = context.global.portavail;\n msg.payload = {};\n \n var port = 27017;\n \n isPortAvailable(port).then( status =>{\n if(status) {\n //console.log('Port ' + port + ' IS available!');\n msg.payload = {'MongoDB':false,\"title\":\"MongoDB\",\"color\":\"red\"}; // The port is available, hence the server is NOT running\n node.send(msg);\n } else {\n //console.log('Port ' + port + ' IS NOT available!');\n //console.log('Reason : ' + isPortAvailable.lastError);\n msg.payload = {'MongoDB':true,\"title\":\"MongoDB\",\"color\":\"green\"}; // The port is not available, so the server MIGHT be running\n node.send(msg);\n \n }\n });\n ","outputs":1,"noerr":0,"x":533,"y":158,"wires":[["2e85d9d.cc25126"]]},{"id":"2e85d9d.cc25126","type":"ui_template","z":"53f8b852.885c6","group":"44e5d7ea.043b2","name":"Status Icon","order":0,"width":0,"height":0,"format":"\n.dot {\n height: 25px;\n width: 25px;\n background-color: #bbb;\n border-radius: 50%;\n display: inline-block;\n float: right;\n}\n\n\n
{{msg.payload.title}}\n \n
","storeOutMessages":true,"fwdInMessages":true,"x":781,"y":161,"wires":[[]]},{"id":"44e5d7ea.043b2","type":"ui_group","z":"","name":"System Status","tab":"7011ff77.15cb18","disp":true,"width":"6"},{"id":"7011ff77.15cb18","type":"ui_tab","z":"","name":"Home","icon":"dashboard"}]

The result:

The above flow and Node UI status indicator template should produce the following result:

NR UI Status Indicator
Node-Red UI Status Indicator

NodeJS BLE Applications using BLENO on Arch Linux

BLENO is a greate NodeJS based library for building applications that communicat with other devices (Smartphones, tables, sensor tags) using Bluetooth Low Energy (BLE).

This post is just to quickly document some requirements for successfully use the BLENO library, in my case, on Arch Linux running the latest Plasma (KDE) desktop.

The tools:

Most the information available on the internet for using and controlling the bluetooth adapter uses the now deprecated tools hcitool, hciconfig and so on. Check here the deprecated list of commands.

So we need to use the new tools from the latest Bluez (Bluetooth Linux implementation): btmgm, btinfo, …

Making Bleno examples work:

The simplest example to try out the BLENO library is the battery example located at: […]/bleno/examples/battery-service

First let’s check if our computer/laptop bluetooth adapter is available: Note that all commands must be ran as the root user:

root@pcortex:/opt/bleno/examples/battery-service# btinfo local
Bluetooth information utility ver 5.45
Failed to open HCI user channel
root@pcortex:/opt/bleno/examples/battery-service# 

This issue can be circumvented by stopping the higher level bluetooth stack:

root@pcortex:/opt/bleno/examples/battery-service# systemctl stop bluetooth
root@pcortex:/opt/bleno/examples/battery-service# btinfo local
Bluetooth information utility ver 5.45
HCI version: 6
HCI revision: 7869
LMP version: 6
LMP subversion: 64512
Manufacturer: 2
root@pcortex:/opt/bleno/examples/battery-service#

In case of previously disabling the Bluetooth through the graphical interface:

Disabling the Bluetooth here will have this behaviour (in this case the bluetooth service is still running):

root@pcortex:/opt/bleno/examples/battery-service# systemctl start bluetooth   (<- After this disable bluetooth on the graphical interface)
root@pcortex:/opt/bleno/examples/battery-service# btinfo local
Bluetooth information utility ver 5.45
Failed to open HCI user channel
root@pcortex:/opt/bleno/examples/battery-service# btmgmt power on
Set Powered for hci0 failed with status 0x12 (Blocked through rfkill)
root@pcortex:/opt/bleno/examples/battery-service# 

Even stopping the Bluetooth service keeps the BT adapter disabled:

root@pcortex:/opt/bleno/examples/battery-service# systemctl stop bluetooth
root@pcortex:/opt/bleno/examples/battery-service# btmgmt power on
Set Powered for hci0 failed with status 0x12 (Blocked through rfkill)
root@pcortex:/opt/bleno/examples/battery-service#

We can check this with the rfkill command:

root@pcortex:/opt/bleno/examples/battery-service# rfkill list
0: phy0: Wireless LAN
        Soft blocked: no
        Hard blocked: no
2: hci0: Bluetooth
        Soft blocked: yes
        Hard blocked: no
root@pcortex:/opt/bleno/examples/battery-service# 

We can unblock now the adapter:

root@pcortex:/opt/bleno/examples/battery-service# rfkill unblock 2
root@pcortex:/opt/bleno/examples/battery-service# rfkill list
0: phy0: Wireless LAN
        Soft blocked: no
        Hard blocked: no
2: hci0: Bluetooth
        Soft blocked: no
        Hard blocked: no
root@pcortex:/opt/bleno/examples/battery-service# btinfo local
Bluetooth information utility ver 5.45
HCI version: 6
HCI revision: 7869
LMP version: 6
LMP subversion: 64512
Manufacturer: 2
root@pcortex:/opt/bleno/examples/battery-service# btmgmt power on
hci0 class of device changed: 0x00010c
hci0 Set Powered complete, settings: powered bondable ssp br/edr le secure-conn 
root@pcortex:/opt/bleno/examples/battery-service# 

So why we are having all this work for making sure that the BT adapter is powered on AND the bluetooth stack is stopped (systemctl stop bluetooth).

The answer is quite simple. If we don’t do this the BLENO examples will seem to work (they start) but the BLE advertised services are the bluetooth Bluez services and not our code.

To explain, check the following behaviour where we start the BLENO Battery Service with the Bluetooth stack started:

root@halcyon:/opt/bleno/examples/battery-service# systemctl start bluetooth
root@halcyon:/opt/bleno/examples/battery-service# node main.js 
on -> stateChange: poweredOn
on -> advertisingStart: success
setServices: success

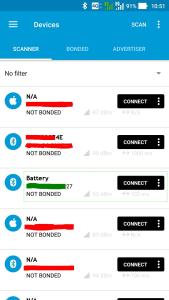
Using the Nordic nRF Connect Android App we can see the non working behaviour vs what we should expect from the Bleno Battery example:

BLE Scan Results

Pressing Connect we can see on Client that no service are provided. This is due to the fact that the desktop bluetooth is enabled):

Now let’s disable the bluetooth stack (which powers the BT adapter) and start again the Bleno Battery example:

root@pcortex:/opt/bleno/examples/battery-service# systemctl stop bluetooth
root@pcortex:/opt/bleno/examples/battery-service# node main.js 

Example hangs in here, because BT adapter is disabled/off

^Croot@pcortex:/opt/bleno/examples/battery-service# btmgmt power on
hci0 class of device changed: 0x00010c
hci0 Set Powered complete, settings: powered bondable ssp br/edr le secure-conn 
root@pcortex:/opt/bleno/examples/battery-service# node main.js 
on -> stateChange: poweredOn
on -> advertisingStart: success
setServices: success

And now if we scan again and connect to the Battery example with our mobile phone through the Nordic application we have:

It works now!

We can confirm that because on the file battery-service.js the service identifier is defined:

function BatteryService() {
  BatteryService.super_.call(this, {
      //uuid: '180F',
      uuid: 'ff51b30e-d7e2-4d93-8842-a7c4a57dfb07',
      characteristics: [
          new BatteryLevelCharacteristic()
      ]
  });
}

and it is the same detected by the Android application.

Upgrading NodeJs and Node Red on Odroid

I run many services on my Odroid C1+ including Node-Red. But since NodeJs on Odroid C1+ is version v0.10 is starting to be seriously old for running Node-Red or other NodeJS dependent software.

So my quick instructions for upgrading NodeJS and Node-Red on the Odroid C1+

Upgrading NodeJS

First verify what version is available/installed on the Odroid:

odroid@odroid:~$ node -v
v0.12.14
odroid@odroid:~$ nodejs -v
v0.10.25

Since I’ve already had previously installed a more recent version of NodeJS (the node command), the version used by Node-Red is v0.12.14 while the default NodeJS version is v0.10.25.

We can also, and should, check the npm version:

odroid@odroid:~$ npm -v
2.15.1

We also need to find what architecture we are using, just for completeness since ODroid C1+ is an ARM7 based architecture:

odroid@odroid:~$ uname -a
Linux odroid 3.10.96-151 #1 SMP PREEMPT Wed Jun 15 18:47:37 BRT 2016 armv7l armv7l armv7l GNU/Linux

This will allow us to download the correct version of the NodeJS binaries from the NodeJS site: NodeJS downloads.
In our case we choose the ARM7 architecture binaries, which at the current time is file: node-v6.9.2-linux-armv7l.tar.xz
So I’ve just copied the link from the NodeJS site and did a wget on the Odroid:

wget https://nodejs.org/dist/v6.9.2/node-v6.9.2-linux-armv7l.tar.xz

I then created a working directory and “untared” the file:

odroid@odroid:~$ mkdir nodework
odroid@odroid:~$ cd nodework
odroid@odroid:~/nodework$ tar xvf ../node-v6.9.2-linux-armv7l.tar.xz
odroid@odroid:~/nodework$ cd node-v6.9.2-linux-armv7l/
odroid@odroid:~/nodework/node-v6.9.2-linux-armv7l$ 

Since there isn’t an install script we need to move the new NodeJS files to the correct locations:

  1. Binaries to /usr/bin
  2. Include files to /usr/include
  3. Libs files to /usr/lib

Copy the binaries, replacing, if existing the older versions:

odroid@odroid:~/nodework/node-v6.9.2-linux-armv7l/bin
$ sudo cp -i node /usr/bin
cp: overwrite ‘/usr/bin/node’? y
odroid@odroid:~/nodework/node-v6.9.2-linux-armv7l/bin$ 

Copy the include files:

odroid@odroid:~/nodework/node-v6.9.2-linux-armv7l/include
$ sudo cp -R node  /usr/include/

and copy the libraries

odroid@odroid:~/nodework/node-v6.9.2-linux-armv7l/lib
$ sudo cp -R node_modules /usr/lib

and finally:

odroid@odroid:~/nodework/node-v6.9.2-linux-armv7l/share
$ sudo cp -R . /usr/share

We need now to make npm to point to the correct nodejs script so, we need to delete the npm link at the /usr/bin and /usr/local/bin directories:

odroid@odroid:~$ sudo rm /usr/bin/npm
odroid@odroid:~$ sudo rm /usr/local/bin/npm

and re-create the correct links:

odroid@odroid:~$ sudo ln -s /usr/lib/node_modules/npm/bin/npm-cli.js /usr/bin/npm
odroid@odroid:~$ sudo ln -s /usr/lib/node_modules/npm/bin/npm-cli.js /usr/local/bin/npm

Running now the node and npm commands should report the latest versions:

odroid@odroid:~$ node -v
v6.9.2
odroid@odroid:~$ npm -v
3.10.9
odroid@odroid:~$ 

Success!

Upgrading Node-Red

From the Node-Red startup log, we can see the previous versions of node-red and nodejs used:

Welcome to Node-RED
===================

28 Dec 17:55:40 - [info] Node-RED version: v0.15.2
28 Dec 17:55:40 - [info] Node.js  version: v0.12.14
28 Dec 17:55:40 - [info] Linux 3.10.96-151 arm LE
28 Dec 17:55:42 - [info] Loading palette nodes
28 Dec 17:55:50 - [info] Dashboard version 2.1.0 started at /ui
28 Dec 17:55:54 - [warn] ------------------------------------------------------
28 Dec 17:55:54 - [warn] [rpi-gpio] Info : Ignoring Raspberry Pi specific node
28 Dec 17:55:54 - [warn] ------------------------------------------------------

we can upgrade now Node-Red according to the Node Red upgrading instructions:

odroid@odroid:~$ sudo npm cache clean
odroid@odroid:~$ sudo npm install -g --unsafe-perm node-red

and after a while the upgrade should be done.

Before starting up node-red I went to the node-red module directories, and did an update:

odroid@odroid:~/.node-red$ npm update
/home/odroid/.node-red
└── crypto-js@3.1.8 

Starting up Node-Red should show now the new software versions:

Welcome to Node-RED
===================

1 Jan 20:35:46 - [info] Node-RED version: v0.15.2
1 Jan 20:35:46 - [info] Node.js  version: v6.9.2
1 Jan 20:35:46 - [info] Linux 3.10.96-151 arm LE
1 Jan 20:35:47 - [info] Loading palette nodes
1 Jan 20:35:54 - [info] Dashboard version 2.2.1 started at /ui

Done!