ESP32 TTGO board and Nordic Thingy:52 sensor device

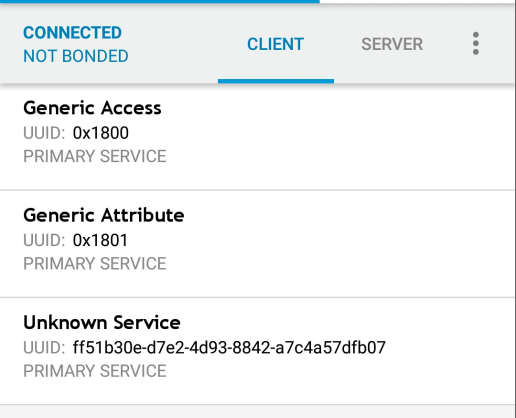
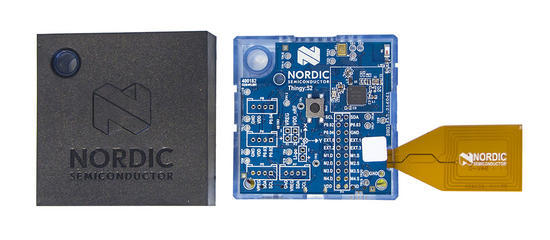
The Nordic Thingy:52 is a 40€/50€ device based on the nRF52832 Nordic microcontroller that has, in a ready to use package, several environmental sensors, that can be accessed by low power Bluetooth (BLE). Nordic provides a complete solution that comprises the Thingy:52 firmware already flashed on the device (Source at GitHub) and an very nice Android Nordic Thingy:52 application, with also sources available at GitHub.

Anyway I have some of these devices for some months now, for other uses, but I decided to test the ESP32 based boards, since the ESP32 has Bluetooth and theoretically can connect and gather gather data from the Thingy. So this post is about the use of the TTGO ESP32 Lora based boards with an OLED to gather data, show it on the OLED, and send it to The Things Network. Seems simple, right?

So when a application connects to the Thingy:52 it can be notified when a sensor value changes throught the standard BLE notification mechanisms. The way the Thingy firmware works, this notification happens at a fixed intervals instead of a value change, and that interval, 5 seconds, 10 seconds, be defined by the Android App or programmatically by our application.

The application is developed by using the PlatformIO and for using the ESP32 Bluetooth interface, I’ve used the NKolban ESP32 BLE Library that happens to be library 1841 at the Platformio repository.

To cut a long story short, as still of today, the ESP32 BLE library doesn’t work correctly with the Thingy:52 notifications. This means that the application subscribes to have notifications, but those never happen. Fortunately someone already hit this problem and solved the issue, but the correction still hasn’t hit the library.

So basically to have my code example to work the following steps are needed:

  1. 1. Clone the TTGO ESP32 repository from . The repository uses the PlatformIO to build the application.
  2. 2. At the root of the repository run the command pio run so that the libraries are downloaded and installed.

At this point we need to correct the Arduino ESP32 library to add the patch to the notification issue.
Just execute the command:

[pcortex@pcortex:ESP32_NordicThingy|master *]$ cd .piolibsdeps/ESP32\ BLE\ Arduino_ID1841/src

At this directory (.piolibsdeps/ESP32\ BLE\ Arduino_ID1841/src edit the file BLERemoteDescriptor.cpp and at around line 151 (the exact line number will probably change in the future) we must change the ::esp_ble_gattc_write_char_descr function parameters:

/**
 * @brief Write data to the BLE Remote Descriptor.
 * @param [in] data The data to send to the remote descriptor.
 * @param [in] length The length of the data to send.
 * @param [in] response True if we expect a response.
 */
void BLERemoteDescriptor::writeValue(
        uint8_t* data,
        size_t   length,
        bool     response) {
    ESP_LOGD(LOG_TAG, ">> writeValue: %s", toString().c_str());
    // Check to see that we are connected.
    if (!getRemoteCharacteristic()->getRemoteService()->getClient()->isConnected()) {
        ESP_LOGE(LOG_TAG, "Disconnected");
        throw BLEDisconnectedException();
    }

    esp_err_t errRc = ::esp_ble_gattc_write_char_descr(
        m_pRemoteCharacteristic->getRemoteService()->getClient()->getGattcIf(),
        m_pRemoteCharacteristic->getRemoteService()->getClient()->getConnId(),
        getHandle(),
        length,                           // Data length
        data,                             // Data
        ESP_GATT_WRITE_TYPE_NO_RSP,
        ESP_GATT_AUTH_REQ_NONE
    );
    if (errRc != ESP_OK) {
        ESP_LOGE(LOG_TAG, "esp_ble_gattc_write_char_descr: %d", errRc);
    }
    ESP_LOGD(LOG_TAG, "<< writeValue");
} // writeValue

We need to change the highlighted line to:

    esp_err_t errRc = ::esp_ble_gattc_write_char_descr(
        m_pRemoteCharacteristic->getRemoteService()->getClient()->getGattcIf(),
        m_pRemoteCharacteristic->getRemoteService()->getClient()->getConnId(),
        getHandle(),
        length,                           // Data length
        data,                             // Data
        response ? ESP_GATT_WRITE_TYPE_RSP : ESP_GATT_WRITE_TYPE_NO_RSP,
        ESP_GATT_AUTH_REQ_NONE
    );

With this change, the code at my github repositories has a working example:

– The ESP32 connects to the Nordic Thingy:52 device.
– It programs the Nordic Device to notify sensor values each 5 seconds (in real use cases it should be much larger period)
– Current sensor data is shown on the serial terminal.

What needs to be done:
– When notified by the Thingy:52, the ESP32 shows the new data on the OLED screen (WIP – Work in progress).
– To keep the application obeying the ISM bands duty cycle, it collects the data, calculates the medium, and sends the data to the Things network each 10 minutes (Also work in progress).

MakeBlock STEM mbot Robot – Using nodeJS to control mbot through BLE

A few weeks ago I’ve bought a mbot robot out of curiosity (also as a gift), since they became available at a nearby major electronic retailer and cheaper than buying them online.

The mbot is a robot chassis with two wheels, some external and onboard sensors, including an external ultrasonic sensor, and all this supported on a custom version of Arduino 328 board whish incorporates a motor driver, battery charger and so on. The version that I’ve bought also came with a LED Matrix display where it is possible to draw faces, text and numbers (mbot Face version).

The mbot robot can be controlled or used by either some Android (and IOS) mobile applications, or by using the Scratch programming environment. MakeBlock has a specific mbot version for Scratch called mblock that supports a set of new programming blocks to control the robot. The use of Scratch and mbot makes it ideal combination for teaching kids about programming and robotics.

We caan communicate/interface with mbot either by using an USB cable, or either by Low Power Bluetooth (the mbot BLE version) or through a 2.4GHz radio (the mbot 2.4GHz version). The 2.4Ghz version is more adequate for a classroom environment, since each robot is automatically bounded by radio to the 2.4GHz USB computer stick radio controller, which basically makes it plug and go and no need to fiddle with BLE discovery and bounding.

Anyway, the version that I have is the BLE one, and this post is about how to use NodeJS with the BLE Noble Library to communicate with mbot when using the factory firmware.

Requisites:

To make this work we need to have some requisites first:

Since mbot uses BLE, the computer must support also BLE. In my case I’m using the CSR 4 BLE dongle available on eBay, Ali and so on, to have BLE support on my computer.

The mbot must be loaded with the factory firmware so the this code can work. This is off course just for testing this code.
The factory firmware can be loaded either by using the mblock program when connected by USB cable, or by using the Arduino IDE.

The mbot BLE module is connected to the serial pins of the onboard arduino, so while the factory firmware has a specific interface, nothing stops us from replacing it with our own code and interface. For now we just keep the factory interface that is based on messages that start with 0xFF 0x55 ….

The code was tested on Linux, and it works fine. No idea if it works on windows…

As far it goes today, the NodeJS Bleno library doesn’t work with the latest node version 10, so we need to use this with a previous version of NodeJS. I’m using NodeJS V8, and also use the NodeJS Version Manager to have several versions of NodeJS active and available.

The BLE interface:
Using the Nordic Connect mobile application, we turn on the mbot, and on the application we start the BLE scan:

A device named Makeblock_LE should appear. We can connect to it and see the published services and characteristics:

There are two known services, and two unknown services. After some testing writing data to those services the service ffe1 is the service that connects to the mbot arduino serial port, and the service ffe4 I have no idea what it is for. Probably for controlling something on the BLE module itself.

The characteristics that the service ffe1 service exposes are:

As we can see, on is for reading data: ffe2 and it supports notification. This means we are warned when data is available so we can read it. The other characteristic is ffe3 that is for writing.

Basically if we connect to the Makeblock_LE BLE device, use the ffe1 service and write on the ffe3 characteristic we can control the robot. Data from the robot is automatically sent to us if we have notifications enabled on the ffe2 characteristic.

The mbot protocol:

There is one post that explains the protocol structure to communicate with the mbot.

Basically every command begins with 0xff 0x55 and then a set of bytes to control something.

The responses follow the same principle of starting with 0xff 0x55 and can return several values types.

An easier way to see what to send is to use mblock, program a scratch example in Arduino mode, and on the mblock serial monitor see what is sent to the robot.

My GitHub code source has some command examples for sending to mbot, namely to control the WS2812 RGB leds, the buzzer, the Led Matrix and to read data from the ultrasonic sensor.

How to use it:

Download the code from here MBot_BLE.

git clone https://github.com/fcgdam/mbot_ble

Make sure that you are using NodeJS version 8:

node -v
v8.11.3

If using Node V10, you can try to install the modules since in a future date from this post, the issues with Noble and NodeJS V10 might be solved.

Install the modules dependencies:

npm install

The code to access the BLE device needs root access, or check how to use Noble without root access:

sudo node mbotble.js

If the Ultrasonic distance sensor is connected to port 3, distance data is shown on the terminal.

That’s it!

Sample output:

The sample output for the mbotble.js when running as root on the RPI 3:

root@firefly:/home/pi/BLEMbot# node blembot.js 
- Bluetooth state change
  - Start scanning...
! Found device with local name: Makeblock_LE
! Mbot robot found! 
  - Stopped scanning...
- Connecting to Makeblock_LE [001010F13480]
! Connected to 001010F13480
! mbot BLE service found!
! mbot READ BLE characteristic found.
! mbot WRITE BLE characteristic found.
- End scanning BLE characteristics.
! Subscribed for mbot read notifications
Reading the ultrasound sensor data...
> mbot data received: "ff550002cb3db9410d0a"
Distance: 23.15517234802246
Reading the ultrasound sensor data...
> mbot data received: "ff5500020000bc410d0a"
Distance: 23.5
Reading the ultrasound sensor data...
> mbot data received: "ff5500027c1ab9410d0a"
Distance: 23.13793182373047
Reading the ultrasound sensor data...
> mbot data received: "ff5500028db0c0410d0a"
Distance: 24.086206436157227
Reading the ultrasound sensor data...
> mbot data received: "ff550002ddd398400d0a"
Distance: 4.775862216949463
Reading the ultrasound sensor data...
> mbot data received: "ff5500024f23d8410d0a"
Distance: 27.017240524291992
...
...
...

Simple BLE bridge to TTN Lora using the TTGO ESP32 LoRa32 board

The TTGO LoRa32 is an ESP32 based board that features Wifi and BlueTooth low energy but also includes an external Lora chip, in my case the SX1276 868Mhz version.

The following code/hack is just to test the feasibility of bridging BLE devices over the ESP32 and then to Lorawan, more specifically sending BLE data to the LoraWan TTN network.

I’m using Neil Koban ESP32 BLE library, that under platformIO is library number 1841 and the base ABP code for connecting to TTN.

In simple terms this code just makes the ESP32 to emulate a BLE UART device for sending and receiving data. It does that by using the Nordic UART known UUID for specifying the BLE UART service and using also the Nordic mobile applications, that supports such device, for sending/receiving data.

Using the Nordic mobile Android phone applications, data can be sent to the Lora32 board either by using the excellent Nordic Connect application or by also using the simpler and direct Nordic UART application.

The tests program just receives data through BLE and buffers it onto an internal message buffer that, periodically, is sent through Lora to the TTN network. I’ve decided arbitrary that the buffer is 32 bytes maximum. We should keep our message size to the necessary minimum, and also just send few messages to keep the lorawan duty factor usage within the required limits.

So, using the following code we can use our phone to scan from the ESP32 BLE device named TTGOLORAESP32 connect to it and send data to the device.

After a while, when the transmission event fires up, data is transmitted, and the BLE device just receives a simple notification with the EV_TXCOMPLETE message.

That’s it.

Starting up with the Nordic NRF52 BLE chip

The nRF52 based chips are the latest version of the popular Bluetooth chip from Nordic that has an ARM Cortex based processor and Bluetooth communications support.
Major differences from the previous nRF51 version includes:

  1. Based on ARM Cortex M4F instead of ARM M0.
  2. Support for the latest Bluetooth 5 specification
  3. On chip NFC support for device bounding and probably something else

The following post centralizes the information that I gathered to start using the demo board that I bought based on the nRF52832 chip.

The eBay,Aliexpress nRF52832 based board:
I’ve bought my nRF52832 based board from AliExpress for around 13€. An higher price than the ESP32 which has both WifI and also blueetooth, but since I really needed to start using the nRF5X base chips I’ve bought what is called “NRF52832 Mini Development Board Gold Core board Wireless Bluetooth Transceiver Module”…

This board build is based on a two boards joined together: one daughter board holding the nRf52832 chip, and another, larger board, exposing the pins, JTAG/SWD connector, power regulator, two leds and two switches. As a bonus the main board was designed for something else and so all the pins silk screen are just plain wrong, but at least the power pins and the SWD pins are correctly identified.

For mapping out correctly the nRF pins to the out pins we need to see the board schematics vs the daughter board pins.

This board schematics are here at this link: NRF52832 Module Test Board V1.0.

And the daughter board pinout is here:

Checking the schematics vs the daughter board pin out we can see that on the pdf schematics file our nRF chip is located where would/should be a CC2640_RGZ module (!…). For example on that module the DIO0 pin corresponds to P25 pin, the DIO1 pin to P26, and so on. We also can check that by, probably sheer luck, the power pins and SWD pins TCLK-SWCLK and TDIO-SWDIO are just right… and so they just reused the main board to hold the nRF52.

Checking out the board and the schematic we can see also that we have a switch on nRF52 pin P04 and two red leds at P30 and P31. The leds can be disconnected by removing the soldering on the nearby solder bridges. The other pins seem free.

As a final note, at least the board that I’ve received, comes with the BLE peripheral Nordic UART example loaded as the running firmware.

More info:Taida Century Gold Core NRF52 board

Programming the board
The board can be programmed at least by two ways:

  1. Openocd On chip debugger – But a set of patchs are needed to support the nRF52
  2. Black Magic Probe – Running on a cheap stm32F103C8T6 board – Blue pill

Both ways allow to successfully program the board and debug the running code.

To avoid making this a very long post I’ve split it into further posts how to build the tools necessary to program the nRF52 chip.

  1. Setting up Openocd for programming the Nordic nRF52832 chip
  2. Building a Black Magic Probe using the “blue pill” STM32F103C8T6 based board

NodeJS BLE Applications using BLENO on Arch Linux

BLENO is a greate NodeJS based library for building applications that communicat with other devices (Smartphones, tables, sensor tags) using Bluetooth Low Energy (BLE).

This post is just to quickly document some requirements for successfully use the BLENO library, in my case, on Arch Linux running the latest Plasma (KDE) desktop.

The tools:

Most the information available on the internet for using and controlling the bluetooth adapter uses the now deprecated tools hcitool, hciconfig and so on. Check here the deprecated list of commands.

So we need to use the new tools from the latest Bluez (Bluetooth Linux implementation): btmgm, btinfo, …

Making Bleno examples work:

The simplest example to try out the BLENO library is the battery example located at: […]/bleno/examples/battery-service

First let’s check if our computer/laptop bluetooth adapter is available: Note that all commands must be ran as the root user:

root@pcortex:/opt/bleno/examples/battery-service# btinfo local
Bluetooth information utility ver 5.45
Failed to open HCI user channel
root@pcortex:/opt/bleno/examples/battery-service# 

This issue can be circumvented by stopping the higher level bluetooth stack:

root@pcortex:/opt/bleno/examples/battery-service# systemctl stop bluetooth
root@pcortex:/opt/bleno/examples/battery-service# btinfo local
Bluetooth information utility ver 5.45
HCI version: 6
HCI revision: 7869
LMP version: 6
LMP subversion: 64512
Manufacturer: 2
root@pcortex:/opt/bleno/examples/battery-service#

In case of previously disabling the Bluetooth through the graphical interface:

Disabling the Bluetooth here will have this behaviour (in this case the bluetooth service is still running):

root@pcortex:/opt/bleno/examples/battery-service# systemctl start bluetooth   (<- After this disable bluetooth on the graphical interface)
root@pcortex:/opt/bleno/examples/battery-service# btinfo local
Bluetooth information utility ver 5.45
Failed to open HCI user channel
root@pcortex:/opt/bleno/examples/battery-service# btmgmt power on
Set Powered for hci0 failed with status 0x12 (Blocked through rfkill)
root@pcortex:/opt/bleno/examples/battery-service# 

Even stopping the Bluetooth service keeps the BT adapter disabled:

root@pcortex:/opt/bleno/examples/battery-service# systemctl stop bluetooth
root@pcortex:/opt/bleno/examples/battery-service# btmgmt power on
Set Powered for hci0 failed with status 0x12 (Blocked through rfkill)
root@pcortex:/opt/bleno/examples/battery-service#

We can check this with the rfkill command:

root@pcortex:/opt/bleno/examples/battery-service# rfkill list
0: phy0: Wireless LAN
        Soft blocked: no
        Hard blocked: no
2: hci0: Bluetooth
        Soft blocked: yes
        Hard blocked: no
root@pcortex:/opt/bleno/examples/battery-service# 

We can unblock now the adapter:

root@pcortex:/opt/bleno/examples/battery-service# rfkill unblock 2
root@pcortex:/opt/bleno/examples/battery-service# rfkill list
0: phy0: Wireless LAN
        Soft blocked: no
        Hard blocked: no
2: hci0: Bluetooth
        Soft blocked: no
        Hard blocked: no
root@pcortex:/opt/bleno/examples/battery-service# btinfo local
Bluetooth information utility ver 5.45
HCI version: 6
HCI revision: 7869
LMP version: 6
LMP subversion: 64512
Manufacturer: 2
root@pcortex:/opt/bleno/examples/battery-service# btmgmt power on
hci0 class of device changed: 0x00010c
hci0 Set Powered complete, settings: powered bondable ssp br/edr le secure-conn 
root@pcortex:/opt/bleno/examples/battery-service# 

So why we are having all this work for making sure that the BT adapter is powered on AND the bluetooth stack is stopped (systemctl stop bluetooth).

The answer is quite simple. If we don’t do this the BLENO examples will seem to work (they start) but the BLE advertised services are the bluetooth Bluez services and not our code.

To explain, check the following behaviour where we start the BLENO Battery Service with the Bluetooth stack started:

root@halcyon:/opt/bleno/examples/battery-service# systemctl start bluetooth
root@halcyon:/opt/bleno/examples/battery-service# node main.js 
on -> stateChange: poweredOn
on -> advertisingStart: success
setServices: success

Using the Nordic nRF Connect Android App we can see the non working behaviour vs what we should expect from the Bleno Battery example:

BLE Scan Results

Pressing Connect we can see on Client that no service are provided. This is due to the fact that the desktop bluetooth is enabled):

Now let’s disable the bluetooth stack (which powers the BT adapter) and start again the Bleno Battery example:

root@pcortex:/opt/bleno/examples/battery-service# systemctl stop bluetooth
root@pcortex:/opt/bleno/examples/battery-service# node main.js 

Example hangs in here, because BT adapter is disabled/off

^Croot@pcortex:/opt/bleno/examples/battery-service# btmgmt power on
hci0 class of device changed: 0x00010c
hci0 Set Powered complete, settings: powered bondable ssp br/edr le secure-conn 
root@pcortex:/opt/bleno/examples/battery-service# node main.js 
on -> stateChange: poweredOn
on -> advertisingStart: success
setServices: success

And now if we scan again and connect to the Battery example with our mobile phone through the Nordic application we have:

It works now!

We can confirm that because on the file battery-service.js the service identifier is defined:

function BatteryService() {
  BatteryService.super_.call(this, {
      //uuid: '180F',
      uuid: 'ff51b30e-d7e2-4d93-8842-a7c4a57dfb07',
      characteristics: [
          new BatteryLevelCharacteristic()
      ]
  });
}

and it is the same detected by the Android application.