These are some tips and information for configuring CentoOS 7 when running on VirtualBox, namely how to install the Virtual Box Extensions.
Checking the network
After installing we should check if we have connectivity namely if the network interface is up or not.
We can configure the network interface has NAT, which will use an internal DHCP server, but this means that the machine will not be accessible without some kind of port forwarding, or we can configure the interface in BRIDGE mode, which means that the machine will behave as the network interface is directly connected to the physical network. In this case an external DHCP server must be available to provide the interface address or we need to provide a static address.
In any case, I normally use the BRIDGE mode with an external DHCP server.
If by any chance the interface is up but has no address, check the network configuration file located in:
/etc/sysconfig/network-scripts/
If our interface is, as in this example, enp0s3 we should edit the file on the above directory named ifcfg-enp0s3 and change the entry (probably at the end of the file) from ONBOOT=no to ONBOOT=yes and reboot. (Note: Not always I needed to do this)
At the end the command ip a should show an active interface:
[root@localhost ~]# ip a
1: lo:  mtu 65536 qdisc noqueue state UNKNOWN qlen 1
    link/loopback 00:00:00:00:00:00 brd 00:00:00:00:00:00
    inet 127.0.0.1/8 scope host lo
       valid_lft forever preferred_lft forever
    inet6 ::1/128 scope host
       valid_lft forever preferred_lft forever
2: enp0s3:  mtu 1500 qdisc pfifo_fast state UP qlen 1000
    link/ether 08:00:27:55:35:7b brd ff:ff:ff:ff:ff:ff
    inet 10.191.0.75/22 brd 10.191.0.255 scope global dynamic enp0s3
       valid_lft 598748sec preferred_lft 598748sec
Updating the system:
Before we are able to install the Virtual Box extensions we should first fully update the system and install some required packages:
yum upgrade
yum install bzip2
yum groupinstall "Development Tools"
yum install "Kernel-devel-uname-r == $(uname -r)"
Installing the guest additions:
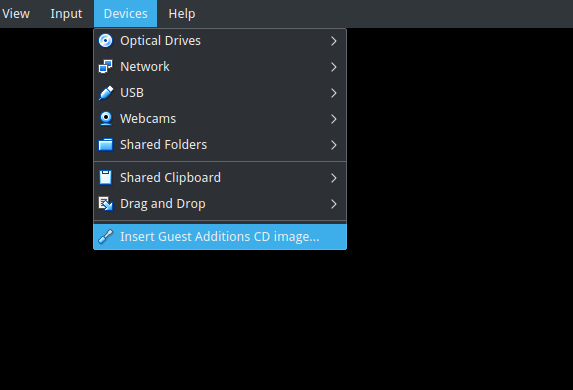
After these per-requisites are installed we should go to the Virtual Box menu and Select Devices->Insert Guest Additions CD Image.
Always as the user root, we can do now two things, mount the CDROM on the directory /mnt or on a created subdirectory on /mnt. Let’s do the later:
[root@localhost ~]# cd /mnt
[root@localhost mnt]# mkdir cdrom
[root@localhost mnt]# mount -r /dev/cdrom /mnt/cdrom
[root@localhost mnt]# ls cdrom
32Bit  64Bit  AUTORUN.INF  autorun.sh  cert  OS2  runasroot.sh  VBoxLinuxAdditions.run  VBoxSolarisAdditions.pkg  VBoxWindowsAdditions-amd64.exe  VBoxWindowsAdditions.exe  VBoxWindowsAdditions-x86.exe
We can now install the additions:
[root@localhost mnt]# cd /mnt/cdrom
root@localhost cdrom]# ./VBoxLinuxAdditions.run
Verifying archive integrity... All good.
Uncompressing VirtualBox 5.1.22 Guest Additions for Linux...........
VirtualBox Guest Additions installer
Removing installed version 5.1.22 of VirtualBox Guest Additions...
Copying additional installer modules ...
Installing additional modules ...
vboxadd.sh: Starting the VirtualBox Guest Additions.
[root@localhost cdrom]#
It should work without any issues. We can now check if the Virtual Box Guest additions modules are running:
[root@localhost cdrom]# lsmod | grep vbox
vboxsf                 39741  0
vboxguest             297360  2 vboxsf
[root@localhost cdrom]#
Success!
Mounting the shared folders
We are now able to mount the shared folders that we define on the virtual box machine configuration.
For example let’s create the following share:
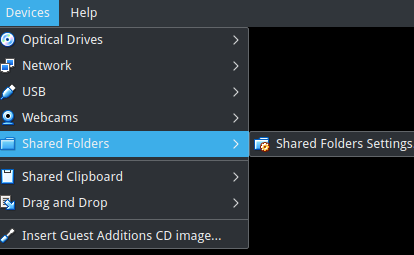
First select Devices->Shared Folders->Shared Folder Settings
And then add a share:
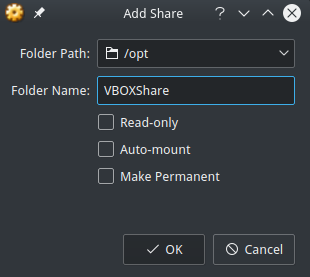
Two important things: The share name is the name that will be used on the mount command. And if the Make Permanent tick box is not selected, the share will be lost on reboot.
So we now can do the following to mount the shared folder:
[root@localhost mnt]# mkdir HostOpt
[root@localhost mnt]# mount -t vboxsf VBOXShare /mnt/HostOpt/
/sbin/mount.vboxsf: mounting failed with the error: Protocol error
[root@localhost mnt]# mount -t vboxsf VBOXShare /mnt/HostOpt
/sbin/mount.vboxsf: mounting failed with the error: Protocol error
[root@localhost mnt]# mount -t vboxsf VBOXShare /mnt/HostOpt
The can happen at least because of two reasons:
First: The share name is invalid. In this case the share name is VBOXShare, but vboxshare can also be used
Second: The configuration is not yet valid or applied (Pressing ok on the create share window).
And that’s it.
